Purchase Order Setup
Purchase Order Setup controls the way purchase orders are printed.
Vendor Tab
This tab is used to manage signatures, logos, and other details to be purchased on requisitions and purchase orders.
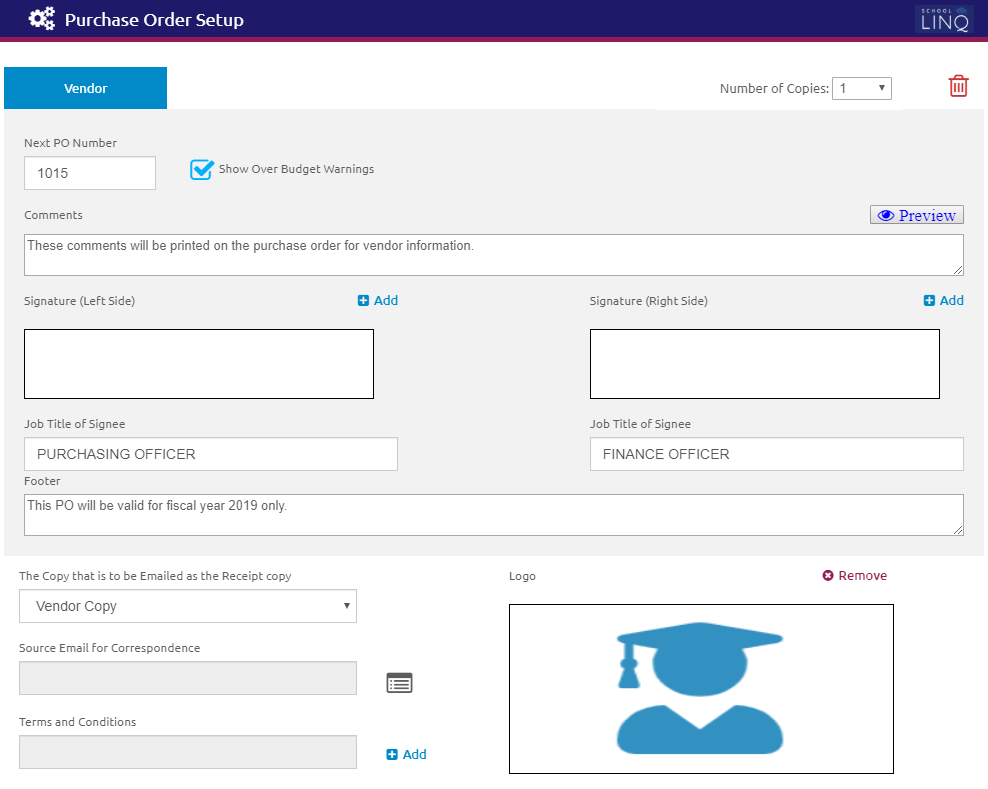
- Select the number of copies of purchase orders that can be created in the Number of Copies drop-down list.
- Up to three (3) copies are allowed, including the main vendor copy and two (2) optional copies.
- Each copy can be customized to satisfy district needs.
- Enter the number the purchase orders should start on in the Next PO Number field.
- By default, the Show Over Budget Warnings check box is checked.
This box indicates whether or not the user will be warned for using an account that is over budget in Manage Purchase Orders.
- Uncheck to disable warning messages for this purchase order.
- Enter Comments to customize each copy of the purchase order.
- Click the Preview button to view an image of the purchase order before saving. This is optional.
- Click the
.png) link to add an image of a Signature (Left Side) to be displayed on the check. This is optional.
link to add an image of a Signature (Left Side) to be displayed on the check. This is optional.- Browse to find the location of the file (.gif, .jpg, .jpeg, .png, .htm, .html, .dib, .mrw, .svg, .tif, .dds, .wdp, .emf, .ico and .wmf are all acceptable formats) and click the
 button to upload it.
 - Enter the signee's job title in the Job Title of the Signee field.
- Browse to find the location of the file (.gif, .jpg, .jpeg, .png, .htm, .html, .dib, .mrw, .svg, .tif, .dds, .wdp, .emf, .ico and .wmf are all acceptable formats) and click the
- Click the link to add an image of a Signature (Right Side) to be displayed on the check. This is optional.
- Browse to find the location of the file (.gif, .jpg, .jpeg, .png, .htm, .html, .dib, .mrw, .svg, .tif, .dds, .wdp, .emf, .ico and .wmf are all acceptable formats) and click the button to upload it.
- Enter the signee's job title in the Job Title of the Signee field.
- Browse to find the location of the file (.gif, .jpg, .jpeg, .png, .htm, .html, .dib, .mrw, .svg, .tif, .dds, .wdp, .emf, .ico and .wmf are all acceptable formats) and click the
- Enter footer text in the Footer field for the additional copies only.
- The vendor copy of a purchase order will not include the account codes and descriptions.
- Account codes and descriptions will be listed on additional copies.
- Select a copy from the The Copy that is to be Emailed as the Receipt copy drop-down list. The vendor copy is automatically selected if no additional copies are being created.
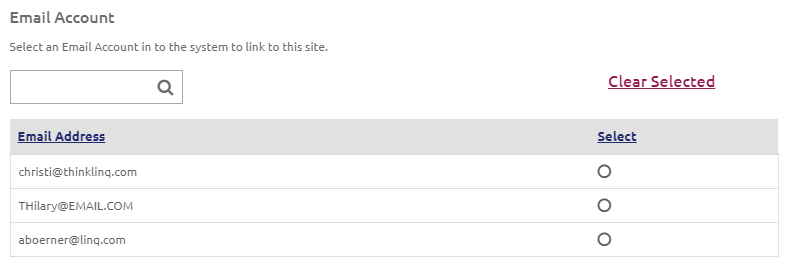
- Click the
 icon to select the Source Email for Correspondence that the purchase order correspondence will be from.
- To search for a specific email account, enter the account name into the
 field.
 - Check the box in the Select column to select an email address.
Click the
.png) button.
button.
- To search for a specific email account, enter the account name into the
- Click the link to add a Logo to be displayed on the purchase order.
- Browse to find the location of the file (.gif, .jpg, .jpeg, .png, .htm, .html, .dib, .mrw, .svg, .tif, .dds, .wdp, .emf, .ico and .wmf are all acceptable formats) and click the button to upload it.
- Click
 in any of the sections the signature or logo are displaying on the purchase order to delete it.
- Browse to find the location of the file (.gif, .jpg, .jpeg, .png, .htm, .html, .dib, .mrw, .svg, .tif, .dds, .wdp, .emf, .ico and .wmf are all acceptable formats) and click the
- Click the link to add an image of the Terms and Conditions to be displayed on the purchase order.
- Browse to find the location of the file (.gif, .jpg, .jpeg, .png, .htm, .html and .pdf are all acceptable formats) and click the button to upload it.
- Browse to find the location of the file (.gif, .jpg, .jpeg, .png, .htm, .html and .pdf are all acceptable formats) and click the
- Click the
 icon to delete a purchase order setup.
 - Click the
 button.
Copy 2 and Copy 3 Tabs
These tabs are identical to the Vendor Copy tab and will display depending on how many copies were selected on the Vendor tab. The same information is required.
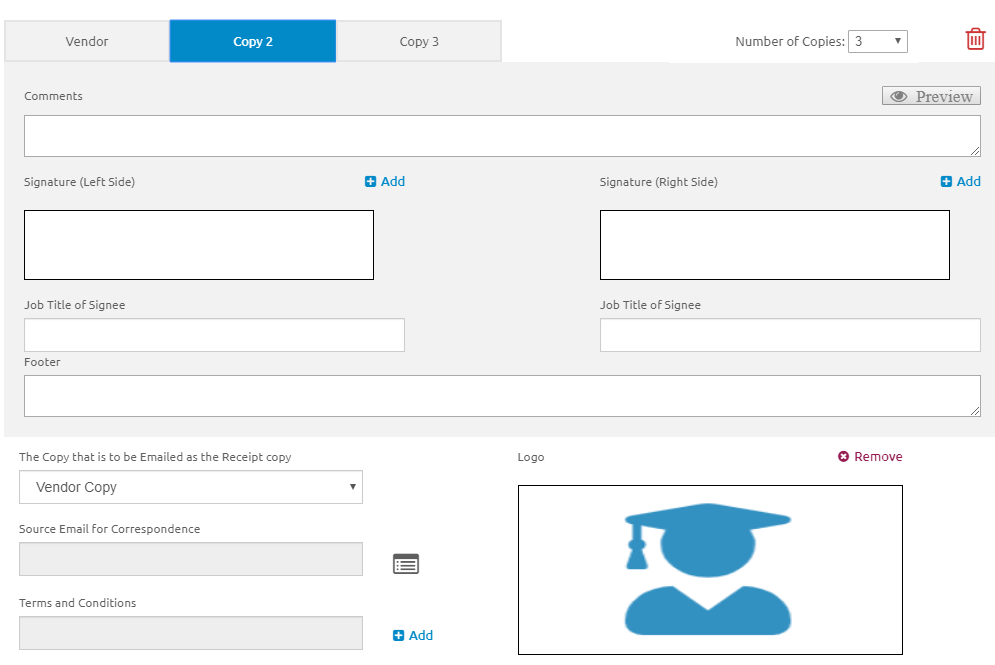
- Fill in the necessary fields.
- Click the button.
©2021 | EMS LINQ, Inc.
School LINQ Help, updated 01/2021